A Developer's Guide to Enabling ILP Payments with Chimoney
Introduction
Welcome to the Chimoney-Interledger integration guide! If you're looking to implement cross-border payments in your application, you're in the right place. This guide will walk you through every step of integrating Chimoney's Interledger-enabled payment services, from basic setup to sending your first payment.
What is Interledger Protocol (ILP)?
The Interledger Protocol (ILP) is like a universal translator for payments. Just as the internet connects different computer networks, ILP connects different payment systems. This means you can send money across borders and between different types of payment systems seamlessly.
What You'll Learn
By the end of this guide, you'll know how to:
- Set up your development environment
- Create Interledger wallet addresses for your users
- Send payments between Interledger wallets
- Handle common errors and edge cases
Prerequisites
- A Chimoney developer account
- Your Chimoney API key
- Node.js and npm/yarn installed
- Axios for making HTTP requests
If you haven't set up your Chimoney developer account yet, refer to this article on how to get started with the Chimoney API.
Setting Up Your Project
1. Create Your Project Directory
Open your terminal and run these commands:
# create and enter project directory
mkdir chimoney-ilp-integration
cd chimoney-ilp-integration

# initialize npm project
npm init -y

# install required dependencies
npm install axios dotenv
2. Set Up Environment Variables
Create a .env file in your project root:
CHIMONEY_API_KEY=your_api_key_here
CHIMONEY_ENV=sandbox  # Change to 'production' when ready
3. Create Your Project Structure
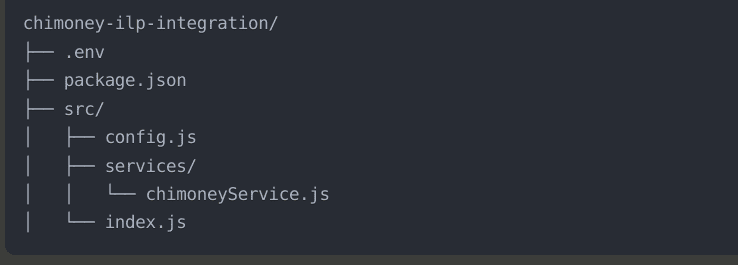
4. Configure Your Application
Create src/config.js:
import dotenv from 'dotenv';
dotenv.config();

export const config = {
  apiKey: process.env.CHIMONEY_API_KEY,
  baseUrl: process.env.CHIMONEY_ENV === 'production'
    ? 'https://api-v2.chimoney.io/v0.2'
    : 'https://api-v2-sandbox.chimoney.io/v0.2',
  headers: {
    accept: 'application/json',
    'content-type': 'application/json',
    'X-API-KEY': process.env.CHIMONEY_API_KEY
  }
};
Creating Your Chimoney Service
Create src/services/chimoneyService.js:
import axios from 'axios';
import { config } from '../config.js';

class ChimoneyInterledgerService {
  constructor() {
    this.baseUrl = config.baseUrl;
    this.headers = config.headers;
  }

  async issueWalletAddress(userID, ilpUsername) {
    try {
      const response = await axios.post(
        `${this.baseUrl}/accounts/issue-wallet-address`,
        {
          userID,
          ilpUsername
        },
        { headers: this.headers }
      );
      return response.data;
    } catch (error) {
      this.handleError(error);
    }
  }

  async sendPayment(walletAddress, amount, subAccount) {
    try {
      const response = await axios.post(
        `${this.baseUrl}/payouts/interledger-wallet-address`,
        {
          interledgerWallets: [
            {
              interledgerWalletAddress: walletAddress,
              amountToDeliver: amount
            }
          ],
          subAccount
        },
        { headers: this.headers }
      );
      return response.data;
    } catch (error) {
      this.handleError(error);
    }
  }

  handleError(error) {
    if (error.response) {
      const errorMessage = error.response.data.message || 'API request failed';
      console.error('API Error:', errorMessage);
      throw new Error(errorMessage);
    }
    throw error;
  }
}

export default ChimoneyInterledgerService;
Using the Service
Create src/index.js:
import ChimoneyInterledgerService from './services/chimoneyService.js';

async function main() {
  const chimoneyService = new ChimoneyInterledgerService();

  try {
    // Issue a new wallet address
    const wallet = await chimoneyService.issueWalletAddress(
      'user123',  // Your user's unique ID
      'john.doe'  // Desired ILP username
    );
    console.log('New wallet created:', wallet);

    // Send a payment
    const payment = await chimoneyService.sendPayment(
      wallet.data.walletAddress,  // Recipient's wallet address
      10,                         // Amount to send
      'your-subaccount-id'       // Your subaccount ID
    );
    console.log('Payment sent:', payment);
  } catch (error) {
    console.error('Error:', error.message);
  }
}

main();
Testing Your Integration
Test Wallet Creation:
// Test creating a wallet
const wallet = await chimoneyService.issueWalletAddress(
  'test-user-1',
  'test.user'
);
console.log(wallet);
Test Sending Payment:
// Test sending a small amount
const payment = await chimoneyService.sendPayment(
  'https://ilp-sandbox.chimoney.com/test.user',
  1,
  'your-subaccount'
);
console.log(payment);
Common Errors and Solutions
1. Authentication Errors
{
  "status": "error",
  "message": "Invalid API key"
}
Solution: Double-check your API key in the .env file
2. Invalid Wallet Address
{
  "status": "error",
  "message": "Invalid wallet address format"
}
Solution: Ensure the wallet address follows the correct format: https://ilp-sandbox.chimoney.com/username
3. Insufficient Funds
{
  "status": "error",
  "message": "Insufficient funds in account"
}
Solution: Add funds to your Chimoney account or reduce the transfer amount
Best Practices
Error Handling
- Always implement comprehensive error handling
- Log errors for debugging
- Provide meaningful error messages to users
Security
- Never commit your API keys
- Use environment variables
- Validate all input data
Testing
- Start with sandbox environment
- Test with small amounts first
- Test error scenarios
Moving to Production
When you're ready to go live:
- Change your environment to production:
CHIMONEY_ENV=production
- Update your API key to the production key
- Update the base URL in your requests to
https://api-v2.chimoney.io/v0.2
Need Help?
- Join the Chimoney Developer Community
- Contact support at support@chimoney.io
Remember to always test thoroughly in the sandbox environment before moving to production.
Check out these other posts

Why 2025 Is The Year AI Agents Get Their Own Wallets (And Passports)